

Cold emailing is more complicated than most other types of communication for two reasons. Firstly, the receiver doesn't know you. Secondly, you can not have verbal interaction in the first place, so your approach cannot be modified in real-time. As a result, many cold email attempts fail.
However, cold emailing is proven to be a powerful and cost-effective tool in case of making initial contact with your prospects.
For example, if you have limited resources but you want to reach out to thousands of leads, you can create automated campaigns and start cold emailing before calling them.
Even when you have a good list and customized emails, it takes some extra work to finesse your outreach. If your campaign gives you less than 10 percent open rates on your emails and replies, or if you would like to improve your overall cold emailing methodology, this guide can help you step up your game.
Your customers already receive tons of emails every day. Consequently, plenty of promotional emails land up in their spam folder. Follow the following tips to ensure yours don't.
Generally, we use 2 types of email providers. Such as:
Choose any paid email provider if you want your corporate domain to gain the trust of your prospects. In addition to that, a paid email provider’s deliverability is much better than that of a free one. A lot of spammers can be seen on the internet, creating a bad image of the free email providers.
No one would care to open your email if your profile hasn’t been set up perfectly. Nobody cares for an email coming from “Shabab” that has no profile picture.

Try to fill up the email profile with authentic information only. Furthermore, add a real name and photo.
SPF, DKIM, and DMARC are technical forms in which an email provider tests whether the email really came from you and not from anyone else.
Two of the ways of configuring email authentication are shown below for your convenience.
SPF (Sender Policy Framework) is an email verification method created to prevent spam by checking the sender's IP address. It helps secure your domain(s) from spoofing and ensures that your emails have been sent accordingly. Mail servers that obtain mail from you use SPF to validate whether the emails that tend to come from your domain actually came from your domain or not.
Note: If you have purchased your domain from a Google collaborator while signing up for Google Workspace, you may not need to configure SPF records.
Follow the following steps to configure SPF records for your domain.
An SPF TXT record specifies mail servers that are authorized to deliver mail to your domain. There can be only one TXT record for SPF for a specific domain. However, a domain TXT record may specify multiple servers and domains that are authorized to deliver mail for the domain.
TXT Record Contents
If all of your organization's emails are sent from Google Workspace, you can use this text line for your TXT record:
v=spf1 include:_spf.google.com ~all
Important: If, in addition to Google Workspace, you deliver mail in one or more of these ways, you must create a custom TXT record:
For instance:
v=spf1 ip4:192.168.0.1/16 include:_spf.google.com include:sparkpostmail.com ~all
This TXT record enables Google Workspace, the IP addresses listed, and the SparkPost, a third-party service, to send emails for your domain. Customize your TXT record by going through Server information for your TXT record and TXT record format.
Enable SPF to your domain provider by adding an SPF DNS TXT record. To enable SPF, update the SPF DNS TXT record to your domain provider.
If your emails sent from your domain(s) are still going to spam, even after following the above steps and enabling SPF, try troubleshooting your SPF records.
DKIM (Domain Keys Identified Mail) implies the possession of an email message by a specific entity. This will add a coded signature to the header of all outgoing emails. Email servers that receive authenticated emails use DKIM to decode the message header and check that the message has not been altered after it has been sent.
If you don't configure your DKIM, then Gmail uses its default DKIM. DKIM signing improves email protection and helps avoid e-mail spoofing. Furthermore, we recommend that you use your unique key on all outgoing emails.
If you do not create your own DKIM domain key, Gmail will sign all emails with this default DKIM domain key: d=*.gappssmpt.com
Emails that were sent from servers outside of the mail. google.com is not going to be signed with this default DKIM key.
You can also use various tools to check these settings. Check your SPF and DKIM settings easily with Mail Tester.

Once you’re done with the configuration of email authentication, you need to warm-up your email account before using any tools.
Warming-up your email account properly is a crucial move to stop getting your emails labeled as spam. This means ensuring your email address looks as real as possible before you use your automated tool. But how to actually warm-up an email account?
One of the most important factors an email provider checks is whether or not you’re playing by the rules, especially if it’s a new account.
That's why you should warm up your email address always.
A warm-up email address is the one that sends and receives emails as a normal human would.
But don’t you worry because OutReachBin has got your back. Worry less, warm-up your email addresses without any mess with our Email Warm-up tool. We connect positively with your emails, helping you develop your credibility as a sender every day. Here’s how you do it:
Allowing your email to warm up is much simpler than you think! Simply follow the steps:
See how this popup setting looks like!

When you’re done with the above steps, you’re good to start your cold emailing outreach.
Once you’re done with the configurations, the system will automatically start ramping up emails for sending and warming-up. It starts with 1,2,4,..... and goes all the way up to 40 per day. The numbers increase gradually.
The system also sends replies to your inbox from other emails in the network. That means you get new prospects without having to manually search for them. The fun fact about this tool is that the whole thing is automated.
Cold emailing is not about sending emails to everyone that crosses your mind. Targeting fixed prospects and planning ahead of time is a good cold emailing strategy.
Instead of sending emails to everyone, find the pain points of your customers. Figure out who’s your next potential client. Once done, you'll be able to plan a beautiful pitch in your cold email that will reflect in the hearts of the recipients.
There are a lot of ways to find addresses - Chrome extensions, databases, and so on. You can take ideas from the following to find the email addresses of your prospects.
LinkedIn profiles often provide cold email addresses you are looking for. You will find many users keep their email addresses on public display on LinkedIn. So, you can actually search for the type of prospect(s) you are looking for and note down the email address for future use.
Use the search box on the top of your LinkedIn home page to start searching and targeting your next potential prospect.

When you find the right profile, expand the drop-down menu from contact info just below the bio.
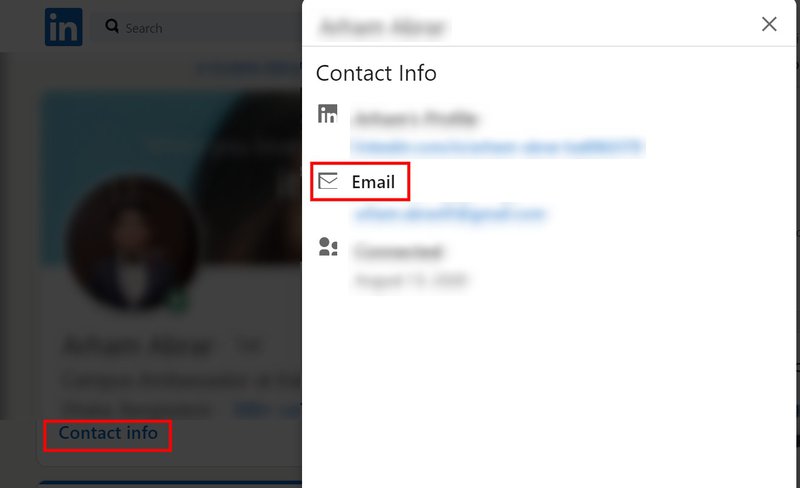
This technique can either be successful or get missed, but it's worth a shot. It's one of the quickest ways to get a confirmed, valid email address.
If there's no email address on public display, don't think about it. We've covered you with a few more assured ways to locate your prospective addresses.
Instead of manually searching for email addresses, you can use some extensions or tools to do that for you. Here are some of the best email finding tools that you can use to level up your game:
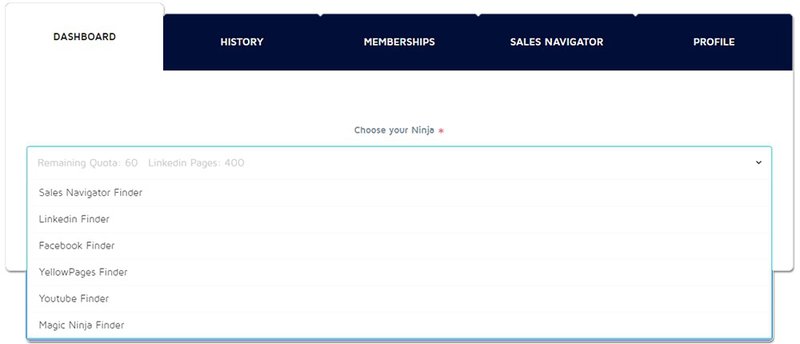
Leadhype Ninja is a Chrome Extension that helps you automate find prospects and collect their data. It not only helps you to extract data and find email addresses from LinkedIn but also helps you to scrape data from Facebook and YouTube. Leadhype also has a Google Sheets Add-On, Leadhype Magic. With the help of this add-on, you can format your data with just one click.
ContactOut is a free Chrome Extension that allows users to locate email addresses from LinkedIn and GitHub as well as send email campaigns. It also has a vast database where you can access billions of email addresses using its Search Engine powered by Artificial Intelligence.

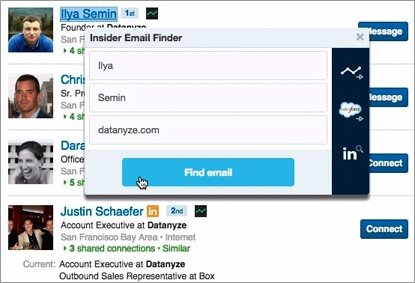
With a view to making cold email outreach a warmer experience, Datanyze helps you capture data while you browse through social media profiles and different company websites. The extension offers two packages, namely, Nyze Lite (free with 10 credits per month) and Nyze Pro ($39 with 1080 credits per year).
Datanyze strives to not only help salespeople communicate with quality prospects but also provide icebreakers that contribute to fruitful conversations.
SellHack is another tool you can go through if you’re a salesperson or an outreach enthusiast. This tool lets you generate leads, locate email addresses, and make a proper list of your potential prospects.
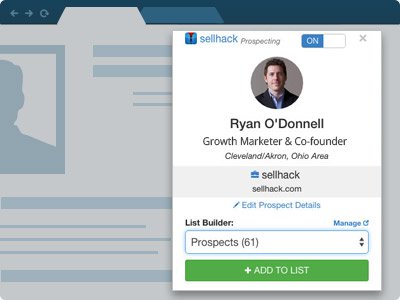
In addition to the 12-step email verification search engine, this tool allows you to automate your sales and reminds you to follow-up. Thus, you can find your next prospect faster in real-time.
Once you’re done finding the right email addresses, you need to make a CSV file. Save the results in a CSV file for the next step. Saving all results to a CSV file can be messy as well. So you need to keep it clean. In order to do so, you need to format the CSV file. To format your file, you follow these tips below:
Now that you found email addresses and saved those in a CSV file, how do you actually upload it?
Before getting started with cold emailing, you need to connect with your email provider.
Head over to the signup page and create an account. After signing up, log in to your account by filling out the credentials.
Connecting to an email provider is quite easy. If you are using a Gmail or GSuite account with your unique domain, you may follow the steps below:
Tap on the Email Providers option from the left panel. Next, click on the sign-in with Google option from the top right corner of your screen. The process is very simple. Just allow permissions, and you’re good to go.

Once you've found emails, done registering on OutReachBin, create a new campaign, and upload your email list, i.e., the CSV file.

Input the name of your campaign and press Next.

Then upload your CSV file or enter emails manually.

After you upload the CSV file or add email addresses manually and press Next, the above screen will pop-up.
Type in your message and set intervals according to your preference. Then schedule your campaign according to your timezone. You’re good to go with your new campaign.
With OutReachBin, you can easily create your personalized campaign. Click here to get started!
If you’ve followed the above steps, you’ll get the pop-up to upload a CSV file or type emails manually. Here’s an example of the next screen that will pop-up on your device after you are done uploading a CSV file.
OutReachBin offers you the option to choose your custom variable(s). For example, if the first column of your file is company name (as shown below), it’ll show you a dropdown menu to choose a custom variable from a list of options under the option Type. It will also show a sample on the rightmost side of the screen. For our example, it’s DS, BacklinkSEO, Verifybee.
You get a number of custom variables while creating a campaign. Follow the steps:
Create New Campaign>Input Campaign Name>Upload CSV

Once you’re done setting up your custom variables, enter Next.

The above screen will appear on your device. Here you can see we have used the variable first name while writing a text body. So, you can actually save a lot of your time and effort just by using the custom variable options.
Here’s the drop-down menu for it:

You can also send test emails to check before sending the actual ones.
Many cold emails don’t get replies back. We are here to help you out. Follow these simple steps and get responses from your prospects.
You’ve already added your email provider if you have followed the aforementioned steps. Now, enable reply tracking and warm-up by following the on-screen prompts.
But how to finesse the cold email message that you’ll send?
As already mentioned above, you can create your campaign and add your email list and start writing your email body.
There are tons of templates online that can help you write an awesome cold email. Other than that, here are some tips and tricks to draw the attention of your prospect(s).
The majority of the population receives a huge amount of emails every day. Their inboxes are very crowded. So, it's impossible to open your email unless you tailor it to your audience. Personalize your email messages to get the receiver's response.
For instance, you’re writing for any previously known candidate. Instead of just copy-pasting any email template, you can modify it according to your prospect. Such as:
Dear {First Name},
Hope you find this email well. We had reached out a while back about the possibilities with a well-known agro-based firm. Things are still going well at {CompanyName}, but your name has resurfaced again with regard to a particular opportunity that I thought you might be interested in.
As you’ve prior experience with an agro firm and since they have a good reputation for candidates coming from a similar background, I felt it makes sense to reconnect, considering the quest's unique nature.
If you're eager to learn more, kindly let me know if you’re up for a quick call. Once again, thank you for your time. I'm expecting to hear from you.
The subject line is one of the most critical aspects of any email. It decides whether or not the recipient will open an email. Even if you write an amazing body, more than fifty percent of it won't be opened.
Here are some sneaky subject lines to grab your prospect’s attention:
1. “Hey, {First Name}! You were recommended to me by [Connections’s Name]”
If you share any mutual connection with your prospect, make sure to mention his/her name in the subject line. The more your prospect trusts your acquaintance, the more likely you will get a reply back.
2. “Up for a new role?”
Use this one if you’re reconnecting with any previous candidate.
3. “Idea for [any problem your prospect might be facing]”
People are more likely to click on any mail if it contains any idea to solve their problem.
4. “Don’t open this email”
Reverse psychology always works. Try it out today.
5. “We have so much in common {First Name}!”
Use this one if you can trace your prospect’s interests. To trace this common interest go through the social media profile(s) of your prospect.
The subject line is the trickiest part of any email. What worked last month or the last prospect might not work for this one. Be versatile, creative, and imaginative for the best outcomes.
The email needs to induce emotion in your prospect's mind. The emotion we've seen working all these years is FOMO or Fear Of Missing Out. You can't be clear about it, though, but you can implicitly imply that they don't really want to lose out on what you're offering.
To imply that they will miss something if they don’t open your email, you can use a sneaky subject line to grab their attention. Such as: “Don’t miss out on the opportunity!”
Nobody's reading a long mail. You don't want your mail to get lost. Be as straightforward and easy as you can in your cold emails.
Take a look at the following examples:
Although the first sentence is grammatically correct, it is wordier than the second one.
This is another comparison to show you how redundancy can be avoided.
The email you send is for them, not you. Don't tell them what they can do for you. Tell them what you can do and offer.
Suppose you’re offering them a discount. Mention it in your email. “If you want to make the best use of this offer, respond to this email within 24-hours” can be a good example sentence that makes your prospect feel the need.
Besides being succinct, you need to avoid phrases that could confuse the recipient. Be as simple as you can with your emails. Make your email readable and convenient. There are just a few brief seconds that your reader can give to your message. Make sure you offer value in those split seconds.
Look at the following two sentences:
The comparison makes shows how avoiding unnecessary jargon makes your sentences clear and easily understandable to your readers. So, next time be precise and straightforward while writing the email body.
Be truthful, and don't make a high statement. Instead, be honest with yourself. This applies not only to your emails but also to your business in general.
Don’t bluff. Instead of saying, “We offer the best service in the entire industry. You won’t ever have trouble navigating your way through.”, say, “Our 24/7 customer service is here to help you out with anything and everything you need. Feel free to reach out to us if you need help navigating your way through our service.”
Make sure you make a call to action. It's better if it's kept easy. Like, you can simply ask them to respond to your email address. Asking applicants to register and submit their resumes for an overview will reduce the response rate. Again, asking them to check their availability on their calendar would do the same thing.
Tell your audience exactly what step you want them to take next, and make it as simple as possible for them to do so. Would you like them to fill out a form? Offer them a direct link to that sort. Better instead, add the form directly to your email.
Don’t ask them to respond to your email as well as fill out a form. You’ll end up getting ignored. Rather choose one of the CTAs. The upside to providing just one CTA is that it's actually helping you keep your email concise and to the point.
If you follow the aforementioned tips, you can easily write an awesome body and start cold emailing.
There is no strict rule to set the delay between each mail. However, the default framework that we recommend is:

You can also add a new step by pressing on ADD NEW STEP at the bottom left side.
Send follow-up emails only when it’s necessary. Don’t be pushy. Maintain a good relationship with the clients.
Don’t forget to personalize the text bodies of your emails using custom variables that we offer. It will create an impression that you wrote it by yourself. As a result, your prospects will be more likely to open it and respond to it.
Not getting responses back to your emails? Here are 10 follow-up email templates that produce results!
Try to schedule your emails according to your prospect’s timezone. Here’s an example:

If you take a closer look, you’ll notice:
But how do you send these cold emails?
Never use any email marketing software to send cold emails. You may wonder why so. The answer is simple. They send bulk emails - tons of emails all at once.
You need to send emails one by one. Use OutReachBin and leave the emailing game to us. We send automated emails in a way that imitates human actions and maximizes your ability to deliver.
This is one of the easiest things to do with OutReachBin. It integrates with your email provider automatically, and cold emails are sent out for a couple of hours or the whole day, according to your plan. We don't blast anyone's inboxes, unlike some marketing software!
You found email addresses, created an account, sent awesome pitches for cold emailing, but how do you evaluate those emails? How will you know whether it’s giving you a good or bad result?
This is where the open, click, reply, and bounce rates enter the picture. But you still want to grasp the meaning of what they're inferring to you.

It displays the number of people who opened your mail.
Your open rate is estimated to be more than 50 percent. If this is less, check your deliverability before you waste time thinking about the subject lines. A possibility is that people are not receiving your emails in the first place.
Click rates totally depend on your campaign strategy and goals. Ideally, you should target a 40+% click rate for your campaign.
A successful response rate starts at 8%. If you see lower results, concentrate on the following:
You need to ensure that your bounce rate is below 5%. The less, the better.
If this is higher, start checking your emails before you send them. Or else, you're going to ruin your image.
It's difficult to send great cold emails from the start. But we got your back. Click here for a few cold email templates that will motivate you to get some wonderful results and generate leads.
If you are a recruiter or you work for any recruiting agency, here are some templates that can get you started.
Try not to copy the exact content. Change it according to your audience.
Cold emailing is legal as long as you properly identify yourself. Include correct sender information with a business address and refrain from poor tactics, as well as provide a convenient method for unsubscribing.
Cold emailing is a great marketing tactic that is still effective in this century. Many global marketers in the B2B industry still use cold emailing to reach out to their prospects.
While cold-emailing can get you great results, a bad cold email can ruin your reputation as well. Here are 9 simple yet effective tips to finesse your cold emailing outreach:
So, keep the above-mentioned things in mind while writing your cold emails.
Actually, this depends on your audience or prospects. Set a time according to the timezone of your prospect for better outcomes. We would recommend sending it between 9-11 a.m. in the morning. According to Campaign Monitor, 53% of the emails are opened or received between 9 a.m.–5 p.m during workdays. We recommend you avoid weekends. It’s more likely that they won’t open it on weekends.
For further queries, reach out to us anytime at [email protected] or contact us by visiting OutReachBin.
Now you know all the nitty-gritty of cold emailing, what’s stopping you? Generate loads of leads by cold emailing and share the results with us.
For getting started with cold emailing, signup NOW! Feel free to reach out to us anytime, and we will always be there to assist you.


![60+ Cold Email Subject Lines: 10x Your Reply Rate [Updated 2021]](https://outreachbin.com/wp-content/uploads/2021/03/emails_324f9b1876a11b736b4675fce2f194cd_2000.jpg)


![Cold Email Templates for Recruiters [Updated 2021]](https://outreachbin.com/wp-content/uploads/2021/01/stencil_twitter-post2_ce1f8f4a604206f405feac682b00546c_2000.jpg)